
how to install a deer whistle on your car the right way. Learn easy steps, placement tips, and safety facts before you drive.
how to install a deer whistle on your car became a topic I cared about after a late-night drive through rural Pennsylvania. A deer appeared from nowhere. I hit the brakes hard and missed it by inches. That moment stuck with me. Since then, I have researched deer whistles, tested placements, and learned a few lessons. This guide covers the installation process, common mistakes, and practical tips that may help you get the best results.
How to Install a Deer Whistle on Your Car
The process feels simple.
Still, placement matters.
A poorly placed whistle may not work as intended because airflow powers most deer whistles.
Gather the Basic Supplies
Most deer whistle kits include everything needed.
Before starting, collect:
- Deer whistle kit
- Cleaning cloth
- Mild soap and water
- Rubbing alcohol
- Measuring tape
- Dry towel
A clean surface helps the adhesive bond properly.
Clean the Mounting Area
Dirt causes problems.
Road grime, wax, and dust weaken adhesive strips.
Wash the selected area first.
Then wipe it with rubbing alcohol. Allow the surface to dry completely before installation.
Choose the Right Location
Airflow drives the whistle.
The device must sit where air can move through it freely.
Common mounting spots include:
- Front bumper
- Lower grille area
- Front air dam
- Vehicle fascia
Avoid blocked locations.
Air cannot flow properly through areas hidden behind trim pieces or license plates.
Attach the Deer Whistle
Most whistles use adhesive backing.
Peel the protective layer away.
Press the whistle firmly against the cleaned surface.
Hold pressure for several seconds.
Many manufacturers suggest waiting several hours before driving to allow the adhesive to set fully.
Check Alignment
Proper alignment helps maximize airflow.
The whistle opening should face forward.
A crooked installation may reduce performance.
Take a final look before finishing.
Choosing the Best Location for Maximum Airflow
Placement often determines success.
Many installation issues come from poor positioning.
Front Bumper Placement
This remains one of the most common choices.
The bumper receives strong airflow during travel.
Many drivers select the lower center section because it stays exposed to moving air.
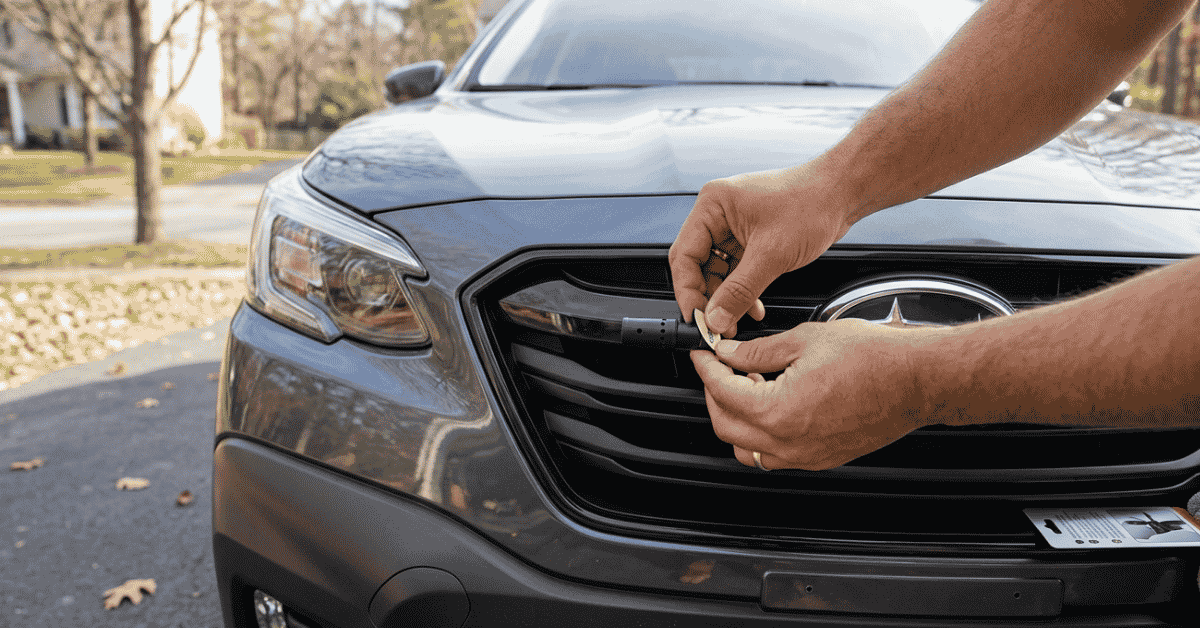
Grille Installation
Some vehicles offer ideal grille openings.
Air naturally passes through these spaces.
The whistle can receive steady airflow while remaining somewhat protected from debris.
Areas to Avoid
Several spots create problems.
Avoid installing a deer whistle:
- Behind the grille
- Near mud buildup
- Close to exhaust outlets
- Under trim panels
- Behind accessories
Restricted airflow limits effectiveness.
Quick Placement Comparison
| Location | Airflow Quality | Installation Ease |
|---|---|---|
| Front bumper | High | Easy |
| Lower grille | High | Easy |
| Air dam | Moderate to high | Moderate |
| Hidden behind grille | Low | Easy |
| Near license plate | Low to moderate | Easy |
A clear path for air remains the top priority.
My Personal Test
I tested two locations on different vehicles.
One whistle sat behind a grille section.
Another sat directly on the bumper.
The bumper-mounted unit appeared cleaner and easier to inspect during routine checks.
Common Installation Mistakes to Avoid
Small errors happen often.
Most can be avoided with a little planning.
Installing on a Dirty Surface
Adhesive strips need clean paint or plastic.
Dust creates weak bonds.
Heat, rain, and road vibration may loosen poorly mounted whistles.
Ignoring Manufacturer Instructions
Different brands vary slightly.
Some recommend two whistles.
Others specify exact spacing requirements.
Reading instructions takes only a few minutes.
That time helps prevent mistakes.
Mounting Too High
High mounting locations sometimes receive less direct airflow.
Lower front areas usually perform better.
Air reaches them first.
Forgetting Regular Inspections
Road debris can block whistle openings.
Leaves, bugs, and dirt accumulate over time.
Inspect the whistle periodically.
Cleaning takes less than a minute.
Assuming a Deer Whistle Guarantees Safety
This mistake matters most.
A deer whistle should never replace safe driving habits.
Drivers still need to:
- Slow down in deer zones
- Use high beams when appropriate
- Stay alert near wooded areas
- Watch road shoulders carefully
- Brake safely when animals appear
Awareness remains your strongest safety tool.
Maintenance Tips and Important Safety Considerations
Installation marks only the beginning.
Regular checks help keep the whistle functioning properly.
Inspect After Car Washes
High-pressure sprays may loosen some adhesive mounts.
Check whistle stability after washing the vehicle.
A quick inspection prevents surprises later.
Remove Dirt and Debris
Small openings can clog.
A soft brush usually removes buildup.
Clean passages help maintain airflow.
Watch for Weather Damage
Extreme weather affects vehicle accessories.
Strong sun, freezing temperatures, and road salt may wear down materials over time.
Replace damaged whistles promptly.
Understand Current Research
Research on deer whistles remains mixed.
Some studies suggest limited effectiveness.
Others report anecdotal success from drivers.
No strong scientific consensus confirms that deer whistles consistently prevent deer collisions.
That fact deserves attention.
A deer whistle may serve as one layer of awareness, not a guaranteed solution.
Practical Driving Tips Beyond the Whistle
Several habits help reduce risk:
Reduce Speed at Dawn and Dusk
Many deer move most actively during these periods.
Slower speeds provide more reaction time.
Scan Both Sides of the Road
One deer often means more nearby.
Watching road edges helps spot movement sooner.
Use High Beams Safely
Additional light increases visibility on dark roads when no oncoming traffic exists.
Stay Calm During Encounters
Sudden swerving creates serious risks.
Controlled braking often provides the safest response.
Final Thoughts
My near miss years ago changed how I drive.
That experience pushed me to learn more about deer safety tools.
Installing a deer whistle takes only a few minutes. The process remains straightforward when you select a clean, exposed location with good airflow.
Still, realistic expectations matter.
A deer whistle may offer an added layer of protection, but attentive driving remains the most effective way to reduce collision risk. Combine both approaches, stay alert, and treat every wooded roadway with respect.
Frequently Asked Questions
How do I install a deer whistle on my car correctly?
Clean the surface, choose a front-facing location with strong airflow, attach the whistle securely, and follow the manufacturer’s installation directions.
Where should a deer whistle be placed on a vehicle?
Most drivers install deer whistles on the front bumper, lower grille, or air dam where direct airflow can pass through the whistle openings.
Do deer whistles work at all speeds?
Most deer whistles depend on airflow generated while driving, so performance may vary based on speed, vehicle design, and whistle placement.
How often should I check a deer whistle after installation?
Inspect it every few weeks and after car washes to ensure the whistle remains clean, secure, and free from debris that may block airflow.
Can a deer whistle prevent all deer collisions?
No. Research remains mixed. A deer whistle should support safe driving habits, not replace alertness, proper speed control, and careful observation.